Save
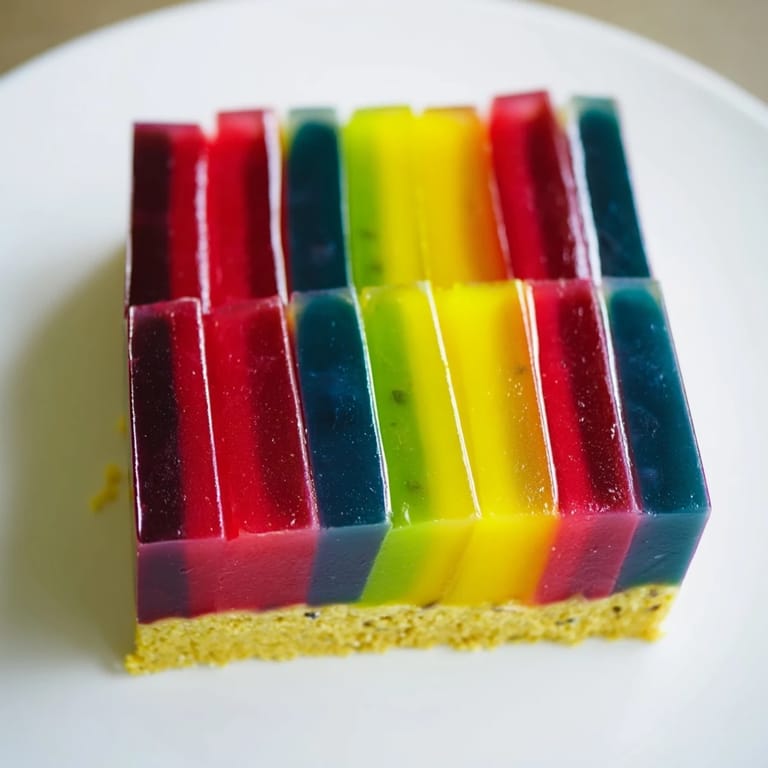
Save There's a moment in every cook's life when you realize desserts don't have to be complicated to be unforgettable. I discovered that truth while scrolling through an old cookbook, mesmerized by a photograph of a slice so impossibly colorful it looked almost CGI. Something about those perfectly arranged V-shaped segments of jewel tones made me want to stop whatever I was doing and figure out how to make it. Three hours later, standing in my kitchen with five bowls of fruity cream and careful hands, I understood why this dessert had captured my imagination so completely.
I made this for my sister's birthday dinner last spring, and the moment I carried it to the table, someone literally gasped. Not because it was fancy—it was genuinely silly how much she loved the colors, like a kid in a candy shop but somehow refined. Watching eight people dig into those V-shaped slices and discover new flavor combinations with each bite reminded me that food isn't just about feeding people, it's about giving them a moment of genuine joy.
Ingredients
- Whole milk and heavy cream: These two create that silky, custard-like base that makes the gelatin set into something you actually want to eat rather than a jiggly mess.
- Granulated sugar: Three tablespoons is the sweet spot—enough to make each layer taste like a proper dessert, not a savory aspic.
- Powdered gelatin or sheets: The backbone of the whole thing; powdered dissolves more easily if you bloom it first like you're waking it up.
- Vanilla extract: Just a teaspoon, but it whispers underneath all those fruit flavors instead of competing with them.
- Fruit purees and food coloring: Raspberry red, mango yellow, kiwi green, blueberry blue, and blackberry purple—or make your own rainbow; just match the colors to your flavors so the whole thing looks intentional.
- Digestive biscuits or graham crackers: The buttery crumb base keeps everything grounded, literally and spiritually.
- Unsalted butter, melted: This binds the crumbs into something that holds its shape and tastes like actual dessert, not cardboard.
Tired of Takeout? 🥡
Get 10 meals you can make faster than delivery arrives. Seriously.
One email. No spam. Unsubscribe anytime.
Instructions
- Build your foundation:
- Crush your biscuits until they look like beach sand, then toss with melted butter and press into your pan like you're tucking them in. Chill this while you get everything else ready—a firm base makes the whole dessert cooperate with you.
- Wake up the gelatin:
- Sprinkle it over cold water and let it sit for five minutes; this softening step (called blooming) prevents lumps that will haunt you later. If you're using sheets, soak them the same way, then gently squeeze out the water.
- Make the custard:
- Heat your milk, cream, and sugar until the sugar disappears and steam starts rising—you want it hot but not bubbling. Remove from heat, stir in the gelatin until it vanishes completely, then add vanilla and mix like you mean it.
- Paint with fruit and color:
- Divide the custard into five bowls, add a different fruit puree and matching food coloring to each one, and stir until the colors are even and gorgeous. This is where the magic starts to feel real.
- Create the V-shaped segments:
- Use aluminum foil or cardboard to divide your pan into five wedge-shaped sections, like you're slicing a pie that hasn't been poured yet. Pour each colored mixture into its own section and chill for thirty minutes until the surface firms up but doesn't fully set.
- Remove the dividers carefully:
- Once the layers have set enough to hold their shape, gently peel away your foil or cardboard, and suddenly you're looking at a mosaic of color instead of separate bowls. This moment never gets old.
- Final chill and release:
- Give everything at least two more hours in the refrigerator to set completely, then run a warm knife around the edge and release the springform. The whole thing should slide out like a jeweled crown.
 Save
Save There's something almost meditative about watching someone discover this dessert for the first time. A friend took one bite, then turned the plate slowly to see how the colors changed depending on which angle she looked at it from, and said nothing for a long moment. When she finally looked up, her whole face had changed—there was genuine wonder there, the kind you don't expect from a spoonful of gelatin and cream, but somehow always get.
The Magic of Fruit Purees
I spent way too long overthinking which fruits to use until I realized the only rule is that the puree's color should match its flavor. Fresh raspberries make a rose-colored layer, mango brings that golden-yellow warmth, and blueberry gives you something almost jewel-like purple. The beauty of this dessert is that it's forgiving enough to work with whatever's at the farmers market—if you find incredible peaches in August, make a peach layer instead, and nobody will ever know you changed the original recipe.
Why V-Shaped Matters
I know the V-shaped segments sound fussy, but they're actually what makes this whole thing work visually. When you slice into it, each piece becomes a little landscape of all five colors, and every single slice looks different depending on where the knife falls. It's the difference between a pretty dessert and a dessert that stops people mid-conversation, and honestly, that's worth the five minutes it takes to set up some foil dividers.
Customization and Serving
This dessert is a blank canvas dressed up like a final answer. You can make it vegan by swapping agar-agar for gelatin and using coconut milk and coconut cream, and it works beautifully—the texture stays silky and the colors glow just as bright. Serve it naked and let the colors do the talking, or crown each slice with fresh whipped cream and a few berries that match the colors in the dessert itself.
- If you're making this for a specific celebration, coordinate the colors to the event—pastels for spring, jewel tones for winter, or whatever makes your heart sing.
- Slice with a hot, wet knife between each cut for clean edges that show off those perfect V-shapes.
- This dessert keeps in the refrigerator for up to three days, so you can make it ahead and just slice it fresh when guests arrive.
 Save
Save This dessert taught me that sometimes the most impressive meals are the ones where you take a little extra time with the details, not the ingredients. Every time I make it, I remember why I fell in love with it in the first place—not because it's difficult, but because it's beautiful, and beauty on a plate has its own kind of magic.
Recipe FAQs
- → How are the colorful layers created?
The layers are made by dividing a gelatin-infused creamy mixture and adding different fruit purees and matching food colors to each portion before pouring them into separated sections of the pan.
- → What gives the dessert its unique V shape?
Aluminum foil or cardboard dividers are used to section the pan into V-shaped segments, helping the layers set in distinct, angled portions.
- → Can this dessert be made vegan?
Yes, by substituting gelatin with agar-agar and using coconut milk and cream alternatives, a vegan version can be prepared.
- → What type of base supports the dessert?
The base consists of crushed digestive biscuits or graham crackers mixed with melted butter, pressed firmly into the pan to form a sturdy foundation.
- → How long should the dessert chill before serving?
After pouring the colored layers and removing the dividers, the dessert should chill for at least two additional hours to fully set and develop its texture.