 Save
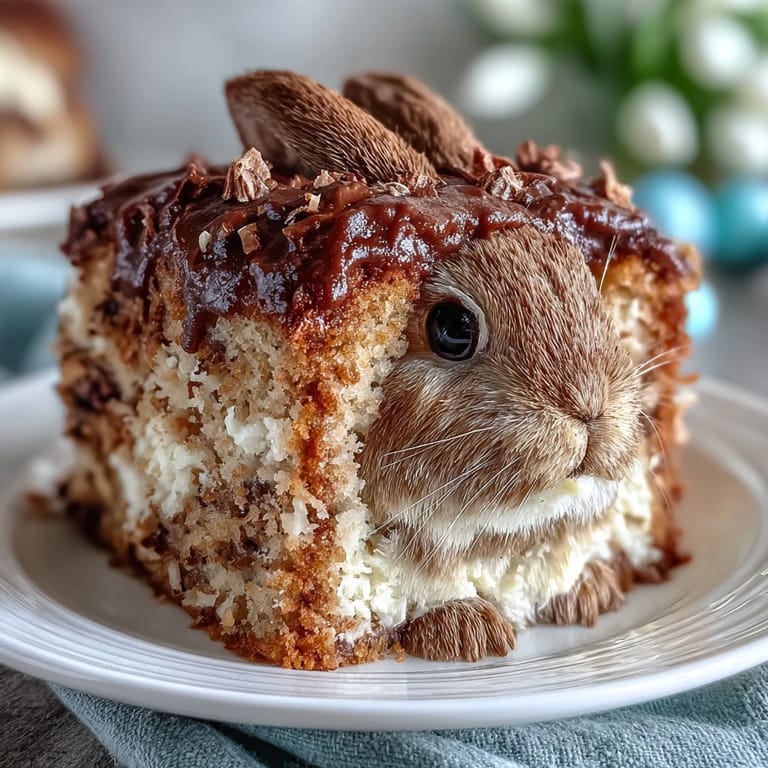
Save My daughter burst into the kitchen on Easter morning with a sketch she'd drawn of a bunny cake, all floppy ears and a goofy smile, and I knew I had to make it happen. There's something magical about turning a simple vanilla cake into a creature that makes kids gasp when they see it on the table. The gold sprinkles were her idea—she wanted it to shimmer like the Easter bunny had sprinkled magic dust on itself. That afternoon, flour everywhere and buttercream in my hair, we created something that felt less like baking and more like sculpting edible happiness. This cake became the centerpiece of our celebration, and honestly, nobody cared about the slightly lopsided ears.
I'll never forget my sister's face when she walked in and saw the bunny sitting on our dining table, complete with coconut fur and sparkling gold accents. She actually said, "Did you buy that at a bakery?" and I felt like I'd won an Olympic medal. We took about forty photos before anyone was allowed to cut into it, and those pictures ended up in our family group chat for months. The best part wasn't the compliments—it was my nephew asking if the bunny had a name before we could eat it.
Ingredients
- All-purpose flour (2 ½ cups): The foundation of your cake, and sifting it really does make a difference in texture—I learned this the hard way after making dense cakes for years.
- Baking powder (2 ½ tsp): This is what gives the bunny its tender crumb and helps it rise evenly in both pans.
- Salt (½ tsp): A small pinch that deepens the vanilla flavor and balances the sweetness.
- Unsalted butter (1 cup for cake, 1 cup for frosting): Room temperature is non-negotiable—cold butter won't cream properly and you'll end up with a dense cake instead of a fluffy one.
- Granulated sugar (2 cups): This creams with the butter to incorporate air, which is the secret to a light, tender crumb.
- Eggs (4 large, room temperature): Cold eggs won't blend smoothly into the batter and can cause the mixture to separate.
- Pure vanilla extract (1 tbsp for cake, 1 tbsp for frosting): Don't skimp here—pure extract makes an actual difference in flavor.
- Whole milk (1 cup): The liquid that keeps this cake moist and tender; whole milk gives better results than low-fat.
- Powdered sugar (4 cups, sifted): Lumpy powdered sugar will make your frosting grainy, so take the thirty seconds to sift it.
- Sweetened shredded coconut (1 cup): This creates the bunny's fluffy fur texture and toasts slightly when baked, adding subtle depth.
- Pink gel food coloring: Gel coloring is more concentrated than liquid, so you need less and it won't thin your frosting.
- Marshmallows (2 large, 2 mini): These become the bunny's cheeks and teeth—use fresh ones or they'll be impossible to position.
- Black licorice laces or black gel icing: For the whiskers and eyes that give your bunny personality.
- Gold sprinkles: The finishing sparkle that makes this cake feel festive and special.
Tired of Takeout? 🥡
Get 10 meals you can make faster than delivery arrives. Seriously.
One email. No spam. Unsubscribe anytime.
Instructions
- Prep your pans and oven:
- Preheat to 350°F and grease and flour those two 9-inch round pans—the flour coating prevents sticking and helps your cake release cleanly. Don't skip the greasing step or you'll be chipping cake out of the pan with a spatula, which is frustrating and sad.
- Mix your dry ingredients:
- Whisk together flour, baking powder, and salt in a medium bowl, breaking up any lumps. This distributes the leavening evenly so your cake rises uniformly instead of having weird bumps.
- Cream the butter and sugar:
- Beat them together for 3 to 4 minutes until the mixture is pale, fluffy, and looks almost like frosting. This creaming action is what incorporates air into the batter and creates that tender, light texture.
- Add eggs one at a time:
- After each egg, beat well before adding the next one, then mix in your vanilla. Rushing this step means your batter might separate or not incorporate the eggs properly.
- Alternate flour and milk:
- Start with flour, then milk, then flour again, mixing until just combined after each addition. Overmixing here develops gluten and makes your cake tough, so stop as soon as you don't see dry streaks.
- Bake with confidence:
- Divide the batter evenly between your prepared pans and bake for 30 to 35 minutes until a toothpick comes out clean. The kitchen will smell incredible—that vanilla-forward aroma is a sign everything's working.
- Cool properly:
- Let the cakes rest in their pans for 10 minutes so they set slightly, then turn them out onto wire racks to cool completely. Putting frosting on a warm cake is a disaster, so be patient here.
- Make the frosting:
- Beat softened butter until creamy, then gradually add sifted powdered sugar along with milk, vanilla, and salt until it's fluffy and spreadable. If it's too thick, add milk a tablespoon at a time; if it's too soft, chill it for 15 minutes.
- Shape your bunny:
- Use one cake round as the face, cut two ovals from the second cake for ears, and use the remaining piece for a bowtie. Arrange everything on your serving platter in a bunny formation—this is where the magic starts.
- Apply the crumb coat:
- Spread a thin layer of frosting over the entire cake shape, chill for 20 minutes so crumbs don't mix into your final layer, then apply a thicker, more generous frosting coat. This technique makes your final frosting look smooth and professional.
- Add the coconut fur:
- Press shredded coconut onto the frosted areas while the frosting is still slightly tacky—this helps it stick. Work in sections and don't worry if it's not perfectly even; coconut has a naturally textured look that's forgiving.
- Tint the details:
- Mix a small portion of coconut with pink food coloring and use it for the inner ears and nose. The pink adds visual interest and makes the bunny feel more expressive.
- Assemble the face:
- Position marshmallows for cheeks, use mini marshmallows for teeth, and arrange black licorice laces or gel icing for whiskers and eyes. Step back and look at your bunny—adjust anything that feels off before you move to sprinkles.
- Finish with sparkle:
- Scatter gold sprinkles over the cake wherever you want shimmer—the ears look especially magical with a generous coating. This is the final moment where your cake transforms into something truly special.
 Save
Save There's a moment when you step back and look at what you've created—this ridiculous, adorable bunny cake with its lopsided smile and coconut-covered body—and you realize that the real magic isn't in perfect technique. It's in the fact that something you made with your own hands is about to bring joy to people you love. That realization hits different every single time, no matter how many cakes you've made.
Why This Cake Stays Fresh and Beautiful
The buttercream frosting creates a protective barrier that keeps this cake moist for days, and the coconut coating adds another layer of insulation. I've learned that covering it loosely with plastic wrap at room temperature keeps it fresh for up to 2 days, while refrigerating extends its life to 5 days without any noticeable drying out. The vanilla cake itself has enough moisture from the milk that it doesn't turn stale quickly, so you can bake it a day ahead and decorate fresh if that makes your life easier.
Making This Cake Your Own
The beauty of this recipe is that it's a canvas for your creativity—you can swap vanilla for almond extract, make it chocolate by substituting ½ cup of flour with cocoa powder, or use different colored coconut to match your celebration theme. I've experimented with edible gold leaf instead of sprinkles for a more elegant version, and it looked absolutely stunning for a spring wedding shower. You can also tint the entire frosting pastel pink or blue instead of leaving it white, which creates a completely different vibe while keeping the same delicious cake underneath.
Troubleshooting and Smart Moves
Sometimes your bunny ears might be slightly different sizes, or the frosting might crack when you apply it—none of this matters because coconut covers most imperfections beautifully. If your cake splits in the middle, you can layer it with extra frosting and nobody will ever notice. The decorative elements like marshmallows and licorice hide so many potential flaws that you can honestly get away with a lot of imprecision here.
- If your frosting is too soft after mixing, pop it in the fridge for 15 minutes and it'll stiffen up without becoming unworkable.
- Warm licorice laces briefly under hot water to make them pliable enough to arrange into whiskers and smiles.
- Keep fresh marshmallows on hand—stale ones crack when you try to position them and ruin the cute factor.
 Save
Save This cake isn't really about creating something Instagram-perfect—it's about making something with your hands that brings smiles to the faces of people who matter. Every slightly wonky ear and slightly off-center nose just adds to the charm.
Recipe FAQs
- → What type of flour is used in the cake?
All-purpose flour provides the ideal structure and texture for the moist vanilla cake.
- → How is the bunny shape created?
The cake rounds are cut into shapes for the face, ears, and bowtie, then arranged on a platter to form the bunny silhouette.
- → What ingredients add the gold sparkle?
Gold sprinkles are used on top of the buttercream to give a shimmering, festive appearance.
- → How is the fluffy texture achieved in the frosting?
Butter is beaten until creamy before powdered sugar, milk, and vanilla are gradually added and whipped into a smooth, airy buttercream.
- → Can the cake be stored after preparation?
Store covered at room temperature for up to 2 days or refrigerate up to 5 days to maintain freshness.