Save
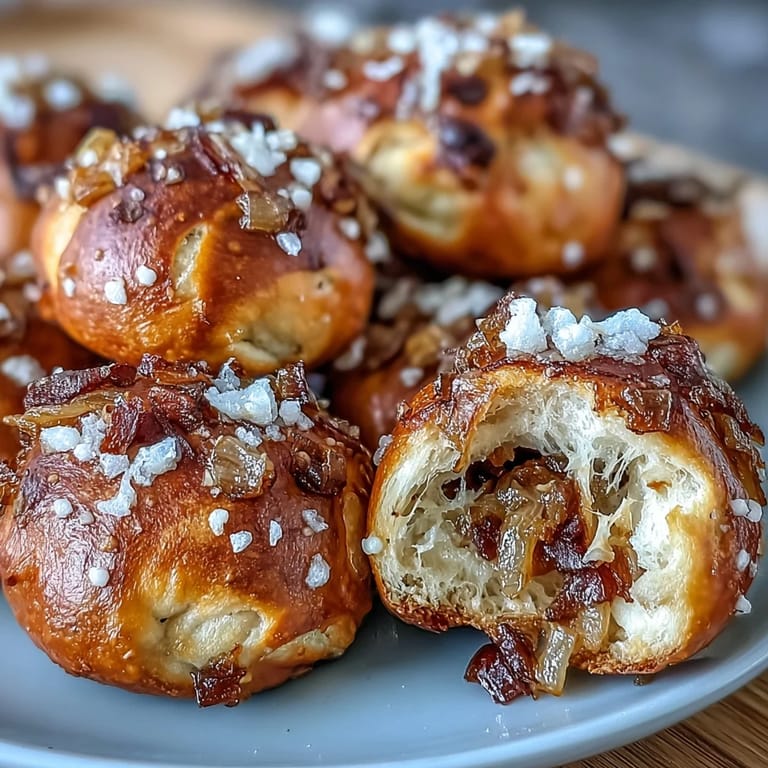
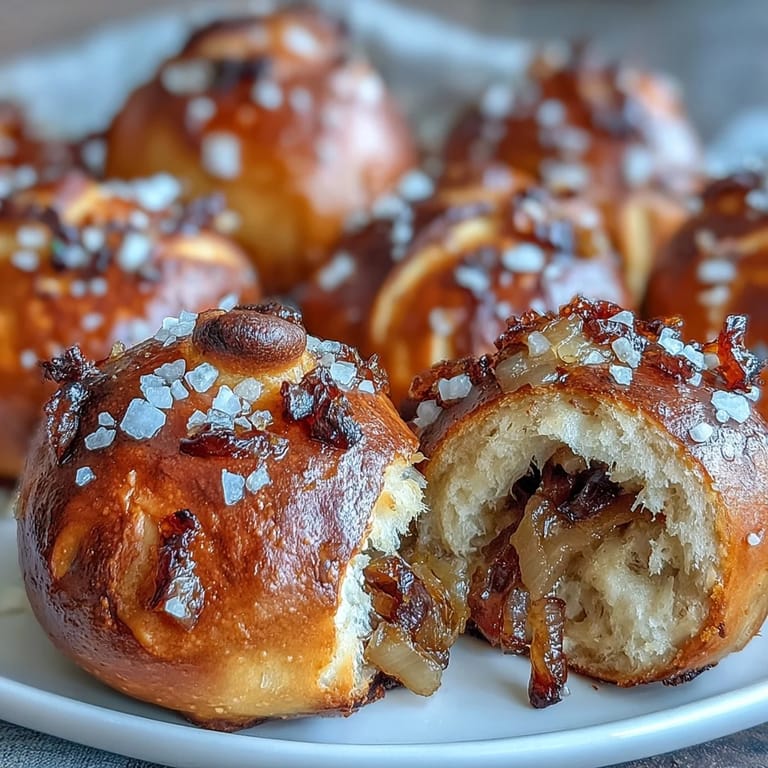
Save There's something about the smell of caramelizing onions that stops me mid-conversation every single time. One Saturday afternoon, I had a sourdough starter that needed feeding and half an idea about turning it into something handheld and warm. The onions were already golden in the skillet, filling my kitchen with that deep, sweet aroma, and it clicked—why not make pretzel bites? Something soft and chewy, studded with those tender onions, finished with a crack of sea salt. My roommate walked in, caught that smell, and before I could even explain what I was doing, she'd already pulled up a chair.
I made these for a small dinner party last month, and watching people reach for a second and third bite felt like a small victory. Someone asked if they were store-bought, which I pretended to be offended about, but secretly loved. By the end of the night, the platter was empty except for salt crystals, and I was already mentally planning when I'd make them again.
Ingredients
- Active sourdough starter (1 cup): This is your foundation—use one that's been fed within the last few hours so it's bubbly and alive, because that's what gives these bites their tender crumb and slight tang.
- Bread flour (2½ cups): Don't substitute with all-purpose here; bread flour has more protein, which means better structure and that slight chew you want in a pretzel.
- Warm water (⅔ cup): Warm but not hot—if it's too hot, you'll kill the starter, if it's too cold, the dough won't rise properly.
- Unsalted butter (2 tbsp), melted: This adds a subtle richness that makes the crumb tender without making them greasy or heavy.
- Granulated sugar (1 tbsp): A small amount feeds the yeast and balances the savory onions with just a whisper of sweetness.
- Fine sea salt (1 tsp for dough): Measured carefully because too much salt will slow fermentation, too little and the flavor falls flat.
- Yellow onion (1 medium), finely diced: Caramelization is everything here—don't rush it, because the longer they cook, the sweeter and more complex they become.
- Olive oil (1 tbsp for onions): Just enough to help the onions release their moisture without adding too much fat to the dough.
- Salt (½ tsp for onions): This draws out the onion's natural liquid and helps them caramelize evenly.
- Water (6 cups for baking soda bath): This needs to be actual water, not broth or anything else, because the chemistry matters for that pretzel crust.
- Baking soda (¼ cup): This is what creates that iconic chewy, dark brown pretzel exterior—the bubbling bath transforms the dough's surface.
- Egg (1), beaten: A simple egg wash that catches the heat and creates that glossy, golden finish.
- Flaky sea salt (for topping): Maldon or similar crystals are worth the small cost because they stay crunchy and add a finishing touch of texture and brightness.
- Optional toppings (chives or dried onion flakes): If you add these, use them sparingly so they don't burn—they're really just for people who want to take the onion flavor even further.
Tired of Takeout? 🥡
Get 10 meals you can make faster than delivery arrives. Seriously.
One email. No spam. Unsubscribe anytime.
Instructions
- Caramelize your onions with patience:
- Heat olive oil in a skillet over medium heat and add your diced onion with a pinch of salt. Stir every couple of minutes—you're aiming for those deep golden-brown bits that stick to the pan, which usually takes about 12 to 15 minutes. Let them cool completely before adding to the dough, or the heat will mess with your fermentation.
- Build your dough:
- In a large bowl, combine your sourdough starter, bread flour, warm water, melted butter, sugar, and salt. Mix by hand or with a dough hook until everything comes together into a shaggy mass—don't worry about it looking perfect yet. This is just the beginning.
- Knead in the onions:
- Add your cooled caramelized onions to the dough and knead by hand or machine for 7 to 10 minutes until the dough is smooth, elastic, and the onions are evenly distributed throughout. You should be able to stretch a small piece between your fingers without it tearing—that's how you know it's ready.
- Let the dough rise:
- Place the dough in a lightly greased bowl, cover it with a damp cloth or plastic wrap, and let it sit in a warm spot for about 2 hours until it's roughly doubled in size. The exact time depends on your kitchen's temperature—if it's cold, it might take longer, and that's okay.
- Prep your station:
- While the dough rises, preheat your oven to 425°F (220°C) and line two baking sheets with parchment paper. Get your baking soda bath ready in a large pot with 6 cups of water—don't add the baking soda yet, wait until you're ready to use it so it stays reactive.
- Shape the bites:
- Turn your risen dough onto a lightly floured surface and divide it into 4 equal pieces. Roll each piece into a long rope about 12 inches, then cut each rope into roughly 1-inch pieces—they don't have to be perfect, irregular shapes actually look more appealing. This is where you'll feel how soft and alive the dough is.
- Boil in baking soda:
- Bring the 6 cups of water to a rolling boil, then carefully add the baking soda—it will bubble up dramatically, which is exactly what you want. Working in small batches so the water stays hot, drop the pretzel bites in for exactly 30 seconds, then fish them out with a slotted spoon and place them on your prepared baking sheets. Don't overcrowd the sheet or they'll stick together.
- Finish and bake:
- Brush each bite with your beaten egg wash so they get that glossy finish, then sprinkle generously with flaky sea salt and any optional toppings. Bake for 12 to 15 minutes until they're a deep golden brown—they should sound slightly hollow if you tap them, which means they're done.
- Cool and serve:
- Let them rest for a few minutes before serving, because the inside is still cooking from residual heat. They're best eaten warm with a cold mustard, cheese dip, or creamy onion dip on the side.
 Save
Save There was a moment, maybe halfway through that dinner party, when I overheard someone tell another guest, unprompted, that these were the best pretzel bites they'd ever had. That feeling of accidentally creating something that lands just right, that makes people genuinely happy—it's why I keep making them. It's never just about feeding people; it's about giving them a moment that tastes a little bit better than ordinary.
The Science of Sourdough in Pretzels
Using sourdough starter instead of commercial yeast changes everything about how these bites develop. The wild yeast ferments more slowly, which means the dough gets more flavor from longer fermentation, but also means you need patience. The acidity from the starter actually helps the baking soda bath work better—the chemical reaction is cleaner and more pronounced, which is why the crust gets so dark and chewy. I learned this the hard way by trying to rush fermentation; those bites turned out dense and the crust was pale and lifeless. Now I treat the rise time as non-negotiable, and the results are worth every minute of waiting.
Why Caramelization Matters
The difference between sautéed onions and caramelized onions is transformative, but it's easy to skip the full process if you're in a hurry. When you caramelize properly, you're cooking off the water content and creating hundreds of complex flavor compounds through the Maillard reaction—that's the same process that makes a good sear on meat. Rushed onions taste sharp and oniony; caramelized ones taste like sweetness, depth, and umami. It's the difference between a decent snack and something people actually remember. My first attempt at these, I cut corners and cooked the onions for only 8 minutes. The bites were technically fine, but nobody asked for the recipe. After I learned my lesson and gave those onions their full 12 to 15 minutes, everything changed.
Storage, Freezing, and Second Chances
These bites keep surprisingly well, which makes them perfect for meal prep or last-minute entertaining. Baked bites stay fresh in an airtight container at room temperature for about 2 days, though they're honestly best within the first day when they're still slightly warm and chewy. For freezing, let them cool completely, then layer them in a freezer container with parchment between layers so they don't stick—they'll keep for up to 3 months. To reheat, pop them in a 350°F (175°C) oven for 5 to 7 minutes and they'll come back to life like nothing happened.
- If you're making these for a crowd, you can bake them a few hours ahead, then just warm them before serving so they taste freshly made.
- The dough can also be shaped and frozen before the baking soda bath, then boiled and baked directly from frozen—add maybe 2 minutes to the boiling time.
- Any leftover egg wash can be saved for tomorrow's toast or scrambled eggs, so nothing goes to waste.
 Save
Save Making these pretzel bites has become one of those recipes I reach for when I want to impress without stress, or when I just want my kitchen to smell incredible for an afternoon. They're the kind of food that tastes like you spent hours in the kitchen, but really just needed patience and a few simple ingredients doing what they do best.
Recipe FAQs
- → How do caramelized onions enhance flavor?
Slow cooking onions in olive oil develops their natural sweetness and deep flavor, adding richness to the sourdough bites.
- → Why is a baking soda bath used before baking?
Dipping the dough pieces in boiling baking soda water creates a distinct chewy crust and glossy appearance typical of pretzels.
- → Can I freeze the pretzel bites?
Yes, baked bites freeze well. Reheat in a 350°F oven for 5–7 minutes to restore freshness and warmth.
- → What is the role of the sourdough starter?
The starter adds natural fermentation, contributing a subtle tanginess and improving texture in the pretzel bites.
- → Are these bites suitable for vegetarians?
Yes, the ingredients used do not include meat, making them appropriate for a vegetarian diet.
- → How long should the dough rise?
The dough needs about 2 hours to double in size, allowing for proper fermentation and elasticity.